...
See https://github.com/ct-Open-Source/tuya-convert
Flash Device
See Detailed instructions can be found: https://github.com/ct-Open-Source/tuya-convert
> ./start_flash.sh
| Code Block |
|---|
pi@raspberrypi:~/tuya-convert $ ./start_flash.sh
Checking for network interface wlan0... Found.
Checking UDP port 53... Available.
Checking UDP port 67... Available.
Checking TCP port 80... Available.
Checking TCP port 443... Available.
Checking UDP port 6666... Available.
Checking UDP port 6667... Available.
Checking TCP port 1883... Available.
Checking TCP port 8886... Available.
======================================================
  Starting AP in a screen
  Starting web server in a screen
  Starting Mosquitto in a screen
  Starting PSK frontend in a screen
  Starting Tuya Discovery in a screen

======================================================

IMPORTANT
1. Connect any other device (a smartphone or something) to the WIFI vtrust-flash
   This step is IMPORTANT otherwise the smartconfig may not work!
2. Put your IoT device in autoconfig/smartconfig/pairing mode (LED will blink fast). This is usually done by pressing and holding the primary button of the device
   Make sure nothing else is plugged into your IoT device while attempting to flash.
3. Press ENTER to continue


======================================================
Starting smart config pairing procedure
Waiting for the device to install the intermediate firmware
Put device in EZ config mode (blinking fast)
Sending SSID                  vtrust-flash
Sending wifiPassword
Sending token                 00000000
Sending secret                0101
................
SmartConfig complete.
Resending SmartConfig Packets
.......................
IoT-device is online with ip 10.42.42.42
Fetching firmware backup
  % Total    % Received % Xferd  Average Speed   Time    Time     Time  Current
                                 Dload  Upload   Total   Spent    Left  Speed
100 1024k  100 1024k    0     0  29735      0  0:00:35  0:00:35 --:--:-- 28574
curl: Saved to filename 'firmware-703769.bin'
======================================================
Getting Info from IoT-device
VTRUST-FLASH 1.5
(c) VTRUST GMBH https://www.vtrust.de/35c3/
READ FLASH: http://10.42.42.42/backup
ChipID: 703769
MAC: 80:7D:3A:70:37:69
BootVersion: 4
BootMode: normal
FlashMode: 1M QIO @ 40MHz
FlashChipId: 1440c8
FlashChipRealSize: 1024K
Active Userspace: user2 0x81000
======================================================
Ready to flash third party firmware!

For your convenience, the following firmware images are already included in this repository:
  Tasmota v7.0.0.3 (wifiman)
  ESPurna 1.13.5 (base)

You can also provide your own image by placing it in the /files directory
Please ensure the firmware fits the device and includes the bootloader
MAXIMUM SIZE IS 512KB

Available options:
  0) return to stock
  1) flash espurna.bin
  2) flash tasmota.bin
  q) quit; do nothing
Please select 0-2: 2
Are you sure you want to flash tasmota.bin? This is the point of no return [y/N] y
Attempting to flash tasmota.bin, this may take a few seconds...
Flashed http://10.42.42.1/files/tasmota.bin successfully in 7835ms, rebooting...
Look for a tasmota-xxxx SSID to which you can connect and configure
Be sure to configure your device for proper function!

HAVE FUN!
======================================================
Do you want to flash another device? [y/N] |
Configuring Dimmer
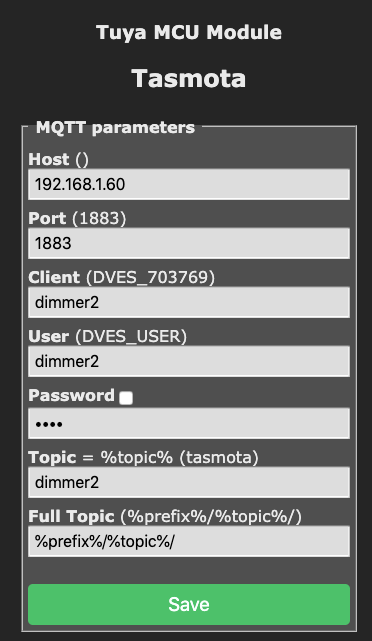
Configuring WIFI
Connect to the flashed device by looking for it's SSID - <tasmota****>- tasmota-####
Browse to http://192.168.4.1/
Configure the SSID and password.
The dimmer will reboot and connect to your wifi network. Check your router to find out it's IP address and connect to it via your browser.
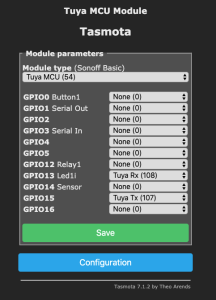
Set the GPIOs
Turn on Weblog
...
| Code Block |
|---|
00:27:49 CMD: TuyaMCU 21,3
00:27:49 SRC: WebConsole from 192.168.1.103
00:27:49 CMD: Group 0, Index 1, Command "TUYAMCU", Data "21,3"
00:27:49 RSL: stat/tasmota/RESULT = {"TuyaMCU":[{"fnId":11,"dpId":1},{"fnId":21,"dpId":3}]} |
> DimmerRange 25, 255
Homebridge Config
For integration with Homebridge, we are going to use the mqttthing plugin and run all of the commands through an mqtt server.
Tasmota Setup:
Homebridge Config File:
| Code Block |
|---|
		{
            "accessory": "mqttthing",
            "type": "lightbulb",
            "name": "dimmer2",
            "url": "http://192.168.X.X:1883",
            "username": "homebridge",
            "password": "pass",
            "topics":
            {
                "getOn":                "stat/dimmer2/POWER",
                "setOn":                "cmnd/dimmer2/POWER",
                "getBrightness":        {
                                          "topic": "stat/dimmer2/RESULT",
                                          "apply": "return JSON.parse(message).Dimmer;"
                                        },
                "setBrightness":        "cmnd/dimmer2/Dimmer"
            },
            "onValue": "ON",
            "offValue": "OFF",
            "startPub":
            {
                "cmnd/dimmer2/POWER": "",
                "cmnd/dimmer2/Dimmer": ""
            }
} |
Reference
| Reference | URL |
|---|---|
| Tuya Convert | https://github.com/ct-Open-Source/tuya-convert |
| *Lasted Docs on Tuya MCU for Tasmota | https://tasmota.github.io/docs/#/TuyaMCU?id=tuyamcu-command |
| *How to setup a Tuya MCU Dimmer (Video) | https://www.youtube.com/embed/_3WW4NVYHrU |
| Tuya MCU Based Dimmers and Switches | https://github.com/arendst/Tasmota/wiki/MCU-Based-Tuya-Dimmers-and-Switches |
| Custom Dimmer Tasmota Firmware | https://github.com/digiblur/TuyaDimmer-Tasmota |
| CE Smart Home Wifi Smart Dimmer Light Switch (TYWE1S) Model WF500D | https://github.com/arendst/Tasmota/issues/4003 |
| CE Dimmer Manual | https://fccid.io/ZZH-WF500D/User-Manual/Users-Manual-3846958#download |
| Tasmota - Tuya Convert | https://tasmota.github.io/docs/#/Tuya-Convert |
| Tasmota - Other Supported Devices | https://github.com/arendst/Tasmota/wiki/Other-devices |
| Video - Setup |
...