| Table of Contents |
|---|
Overview
We will detail the steps required to flash the open source Tasmota firmware on a Treatlife 3 way switch and configure it to work with Homebridge.
Hardware
Install Tuya Convert on a Raspberry Pi
See https://github.com/ct-Open-Source/tuya-convert
Flash Device
Detailed instructions can be found: https://github.com/ct-Open-Source/tuya-convert
You will need to hold down the button to get this switch to flash.
> ./start_flash.sh
Configuring Switch
Configuring WIFI
Connect to the flashed device by looking for it's SSID - tasmota-####
Browse to http://192.168.4.1/
Configure the SSID and password.
The dimmer will reboot and connect to your wifi network. Check your router to find out it's IP address and connect to it via your browser.
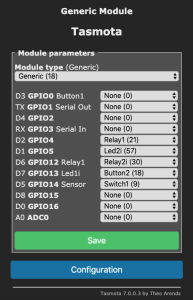
Set the GPIOs
Issue the following from the console:
> backlog module 18;gpio4 21;gpio5 57;gpio12 30;gpio13 18;gpio14 9;switchtopic 0;switchmode1 0;buttontopic 0;rule1 on event#ON do power2 TOGGLE endon;rule1 1;rule2 on event#OFF do power2 TOGGLE endon;rule2 1
Should result in the following:
Homebridge Config
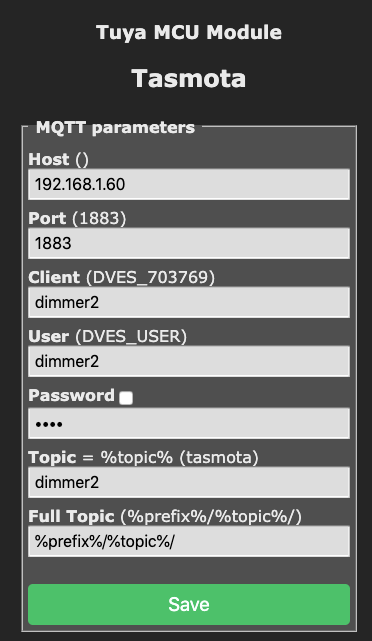
For integration with Homebridge, we are going to use the mqttthing plugin and run all of the commands through an mqtt server.
Tasmota Setup:
Homebridge Config File:
| Code Block |
|---|
		{
            "accessory": "mqttthing",
            "type": "lightbulb",
            "name": "dimmer2",
            "url": "http://192.168.X.X:1883",
            "username": "homebridge",
            "password": "pass",
            "topics":
            {
                "getOn":                "stat/dimmer2/POWER",
                "setOn":                "cmnd/dimmer2/POWER",
                "getBrightness":        {
                                          "topic": "stat/dimmer2/RESULT",
                                          "apply": "return JSON.parse(message).Dimmer;"
                                        },
                "setBrightness":        "cmnd/dimmer2/Dimmer"
            },
            "onValue": "ON",
            "offValue": "OFF",
            "startPub":
            {
                "cmnd/dimmer2/POWER": "",
                "cmnd/dimmer2/Dimmer": ""
            },
		    "confirmationPeriodms": 1000
} |