| Table of Contents |
|---|
...
Install Kubernetes
> sudo apt-get update
> sudo apt-get install -y docker.io
Install Curl
> sudo apt-get install -y apt-transport-https curl
Install Kubernetes
| Code Block |
|---|
curl -s https://packages.cloud.google.com/apt/doc/apt-key.gpg | sudo apt-key add - echo "deb https://apt.kubernetes.io/ kubernetes-xenial main" | sudo tee -a /etc/apt/sources.list.d/kubernetes.list sudo apt-get update sudo apt-get install -y kubectl kubelet kubeadm sudo apt-mark hold kubelet kubeadm kubectl |
...
| Code Block |
|---|
[config/images] Pulled k8s.gcr.io/kube-apiserver:v1.13.1 [config/images] Pulled k8s.gcr.io/kube-controller-manager:v1.13.1 [config/images] Pulled k8s.gcr.io/kube-scheduler:v1.13.1 [config/images] Pulled k8s.gcr.io/kube-proxy:v1.13.1 [config/images] Pulled k8s.gcr.io/pause:3.1 [config/images] Pulled k8s.gcr.io/etcd:3.2.24 [config/images] Pulled k8s.gcr.io/coredns:1.2.6 |
Disable SWAP
> swapoff -va
> vi /etc/fstab
|
> reboot
...
Initialize Master (using Flannel)
> sudo kubeadm init --apiserver-advertise-address <IP ADDRESS> ADDRESS> --pod-network-cidr 192=10.168244.0.0/16
| Code Block |
|---|
... [init] Using Kubernetes version: v1.13.2 [preflight] Running pre-flight checks [preflight] Pulling images required for setting up a Kubernetes cluster [preflight] This might take a minute or two, depending on the speed of your internet connection [preflight] You can also perform this action in beforehand using 'kubeadm config images pull' [kubelet-start] Writing kubelet environment file with flags to file "/var/lib/kubelet/kubeadm-flags.env" [kubelet-start] Writing kubelet configuration to file "/var/lib/kubelet/config.yaml" [kubelet-start] Activating the kubelet service [certs] Using certificateDir folder "/etc/kubernetes/pki" [certs] Generating "ca" certificate and key [certs] Generating "apiserver-kubelet-client" certificate and key [certs] Generating "apiserver" certificate and key [certs] apiserver serving cert is signed for DNS names [deepthought kubernetes kubernetes.default kubernetes.default.svc kubernetes.default.svc.cluster.local] and IPs [10.96.0.1 192.168.1.50] [certs] Generating "front-proxy-ca" certificate and key [certs] Generating "front-proxy-client" certificate and key [certs] Generating "etcd/ca" certificate and key [certs] Generating "etcd/server" certificate and key [certs] etcd/server serving cert is signed for DNS names [deepthought localhost] and IPs [192.168.1.50 127.0.0.1 ::1] [certs] Generating "etcd/peer" certificate and key [certs] etcd/peer serving cert is signed for DNS names [deepthought localhost] and IPs [192.168.1.50 127.0.0.1 ::1] [certs] Generating "etcd/healthcheck-client" certificate and key [certs] Generating "apiserver-etcd-client" certificate and key [certs] Generating "sa" key and public key [kubeconfig] Using kubeconfig folder "/etc/kubernetes" [kubeconfig] Writing "admin.conf" kubeconfig file [kubeconfig] Writing "kubelet.conf" kubeconfig file [kubeconfig] Writing "controller-manager.conf" kubeconfig file [kubeconfig] Writing "scheduler.conf" kubeconfig file [control-plane] Using manifest folder "/etc/kubernetes/manifests" [control-plane] Creating static Pod manifest for "kube-apiserver" [control-plane] Creating static Pod manifest for "kube-controller-manager" [control-plane] Creating static Pod manifest for "kube-scheduler" [etcd] Creating static Pod manifest for local etcd in "/etc/kubernetes/manifests" [wait-control-plane] Waiting for the kubelet to boot up the control plane as static Pods from directory "/etc/kubernetes/manifests". This can take up to 4m0s [apiclient] All control plane components are healthy after 3226.023753002483 seconds [uploadconfig] storing the configuration used in ConfigMap "kubeadm-config" in the "kube-system" Namespace [kubelet] Creating a ConfigMap "kubelet-config-1.13" in namespace kube-system with the configuration for the kubelets in the cluster [patchnode] Uploading the CRI Socket information "/var/run/dockershim.sock" to the Node API object "deepthought" as an annotation [mark-control-plane] Marking the node deepthought as control-plane by adding the label "node-role.kubernetes.io/master=''" [mark-control-plane] Marking the node deepthought as control-plane by adding the taints [node-role.kubernetes.io/master:NoSchedule] [bootstrap-token] Using token: o2ps3x0s0oa4.qyocvh9yiln7f2jf2i5lo5vyuyvbnze6 [bootstrap-token] Configuring bootstrap tokens, cluster-info ConfigMap, RBAC Roles [bootstraptoken] configured RBAC rules to allow Node Bootstrap tokens to post CSRs in order for nodes to get long term certificate credentials [bootstraptoken] configured RBAC rules to allow the csrapprover controller automatically approve CSRs from a Node Bootstrap Token [bootstraptoken] configured RBAC rules to allow certificate rotation for all node client certificates in the cluster [bootstraptoken] creating the "cluster-info" ConfigMap in the "kube-public" namespace [addons] Applied essential addon: CoreDNS [addons] Applied essential addon: kube-proxy Your Kubernetes master has initialized successfully! To start using your cluster, you need to run the following as a regular user: mkdir -p $HOME/.kube sudo cp -i /etc/kubernetes/admin.conf $HOME/.kube/config sudo chown $(id -u):$(id -g) $HOME/.kube/config You should now deploy a pod network to the cluster. Run "kubectl apply -f [podnetwork].yaml" with one of the options listed at: https://kubernetes.io/docs/concepts/cluster-administration/addons/ You can now join any number of machines by running the following on each node as root: kubeadm join 192.168.1.50:6443 --token o2ps3x0s0oa4.qyocvh9yiln7f2jf2i5lo5vyuyvbnze6 --discovery-token-ca-cert-hash sha256:09f10f1817080df227613187ba3fe2e0608f99ecd38dc9c6bf74e934df631d6420b8104c05927611df68ebb0eb9fbf8f65d3b85d2e57de9ecc5468e5369b9c22 |
Record the kubeadm join command!
...
Install Flannel Network Plugin
> sudo sysctl net.bridge.bridge-nf-call-iptables=1
> > kubectl apply -f https://raw.githubusercontent.com/coreos/flannel/masterbc79dd1505b0c8681ece4de4c0d86c5cd2643275/Documentation/kube-flannel.yml
Verify that all of your kubernetes pods are running
NOTE: See https://kubernetes.io/docs/setup/independent/create-cluster-kubeadm/ for details on the various plugins and their setup.
Verify that all of your kubernetes pods are running
> kubectl get pods --all-namespaces
| Code Block |
|---|
NAMESPACE NAME READY STATUS RESTARTS AGE kube-system coredns-86c58d9df4-8zk5t 1/1 Running 0 47h kube-system coredns-86c58d9df4-tsftk 1/1 Running 0 47h kube-system etcd-k8master 1/1 Running 1 47h kube-system kube-apiserver-k8master 1/1 Running 1 47h kube-system kube-controller-manager-k8master 1/1 Running 1 47h kube-system kube-flannel-ds-amd64-fl5wp 1/1 Running 0 12s kube-system kube-proxy-88gdq 1/1 Running 1 47h kube-system kube-scheduler-k8master 1/1 Running 1 47h |
Enable Scheduling Pods on Master Node
By default, your cluster will not schedule pods on the master for security reasons. If you want to be able to schedule pods on the master, e.g. for a single-machine Kubernetes cluster for development, run:
> kubectl taint nodes --all node-role.kubernetes.io/master-
Install Dashboard
From the master node:
| Code Block |
|---|
> kubectl create -f https://raw.githubusercontent.com/kubernetes/dashboard/master/aio/deploy/recommended/kubernetes-dashboard.yaml secret/kubernetes-dashboard-certs created serviceaccount/kubernetes-dashboard created role.rbac.authorization.k8s.io/kubernetes-dashboard-minimal created rolebinding.rbac.authorization.k8s.io/kubernetes-dashboard-minimal created deployment.apps/kubernetes-dashboard created service/kubernetes-dashboard created service/kubernetes-dashboard created |
Create a dashboard admin user:
vi dashboard-adminuser.yaml
| Code Block |
|---|
apiVersion: v1
kind: ServiceAccount
metadata:
  name: admin-user
  namespace: kube-system
---
apiVersion: rbac.authorization.k8s.io/v1
kind: ClusterRoleBinding
metadata:
  name: admin-user
roleRef:
  apiGroup: rbac.authorization.k8s.io
  kind: ClusterRole
  name: cluster-admin
subjects:
- kind: ServiceAccount
  name: admin-user
namespace: kube-system |
> kubectl apply -f dashboard-adminuser.yaml
| Code Block |
|---|
serviceaccount/admin-user created
clusterrolebinding.rbac.authorization.k8s.io/admin-user created |
Get the access token
| Code Block |
|---|
> kubectl -n kube-system describe secret $(kubectl -n kube-system get secret | grep admin-user | awk '{print $1}')

Name:         admin-user-token-s6x6d
Namespace:    kube-system
Labels:       <none>
Annotations:  kubernetes.io/service-account.name: admin-user
              kubernetes.io/service-account.uid: 7f55a022-1a05-11e9-a8cb-6c3be541582b

Type:  kubernetes.io/service-account-token


Data
====
namespace:  11 bytes
token:      eyJhbGciOiJSUzI1NiIsImtpZCI6IiJ9.eyJpc3MiOiJrdWJlcm5ldGVzL3NlcnZpY2VhY2NvdW50Iiwia3ViZXJuZXRlcy5pby9zZXJ2aWNlYWNjb3VudC9uYW1lc3BhY2UiOiJrdWJlLXN5c3RlbSIsImt1YmVybmV0ZXMuaW8vc2VydmljZWFjY291bnQvc2VjcmV0Lm5hbWUiOiJhZG1pbi11c2VyLXRva2VuLXM2eDZkIiwia3ViZXJuZXRlcy5pby9zZXJ2aWNlYWNjb3VudC9zZXJ2aWNlLWFjY291bnQubmFtZSI6ImFkbWluLXVzZXIiLCJrdWJlcm5ldGVzLmlvL3NlcnZpY2VhY2NvdW50L3NlcnZpY2UtYWNjb3VudC51aWQiOiI3ZjU1YTAyMi0xYTA1LTExZTktYThjYi02YzNiZTU0MTU4MmIiLCJzdWIiOiJzeXN0ZW06c2VydmljZWFjY291bnQ6a3ViZS1zeXN0ZW06YWRtaW4tdXNlciJ9.btoYxamkG_dww0sht85C_txkXr6v0rwISzwkyGT1ivj9MIgrvBG0eF044VOihhWyqjv-lJQOpbFk3TnbDE4QWUr9aFyiQZo_qQGgqSj_NBKWuDw3N0KTjk_siB_3Zb4tOCGe9i0iJ3zwYxDlh5eAD_-YiY-yU8QKY85pJPbTqR4USWiHh4Saj4HEg0TM0EUIToCqF-u9qEF0Y51dc17VW3NKeCEIfarP4x893yzYRnNrbk8ItgjQqln6oQ2AH49dow28fUiGyUCcu1dazXrOr0A_j-Lg-5KaVkT6dXIU5SMMMlrhszrdmrK9akbEP3AdKRErVNosVR_afWdOo8lByA
ca.crt: 1025 bytes |
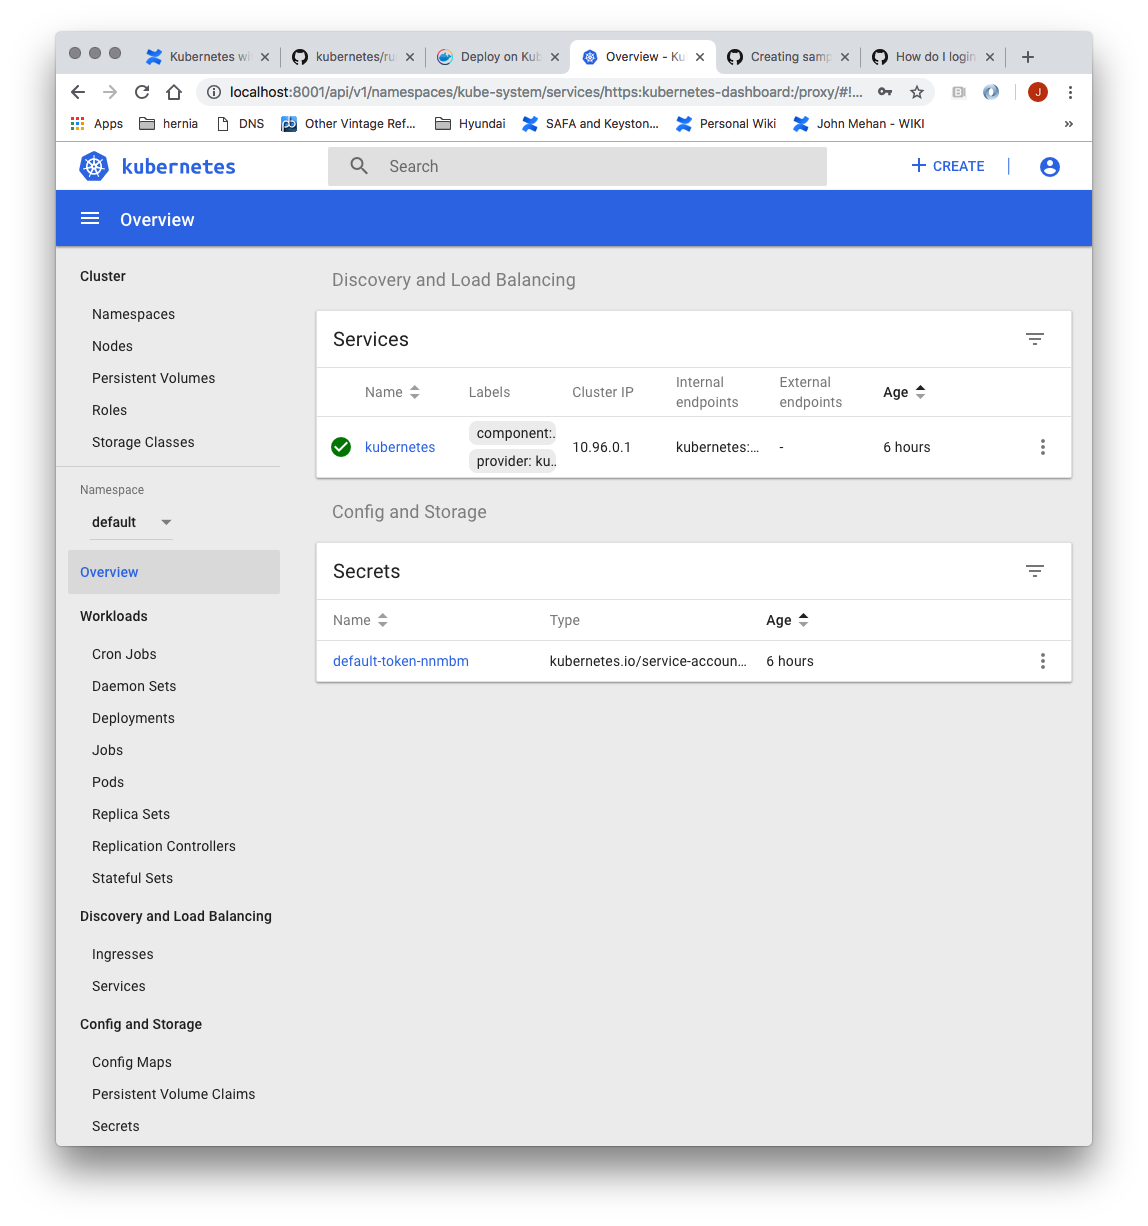
Access the Dashboard by using the API proxy
From your local machine:
> ssh -L 8001:127.0.0.1:8001 <USER>@<IP>
...
http://localhost:8001/api/v1/namespaces/kube-system/services/https:kubernetes-dashboard:/proxy/.
Access the Dashboard using port forwarding
From your local machine:
> ssh -L 8443:127.0.0.1:8443 <USER>@<IP>
...
Browse to:
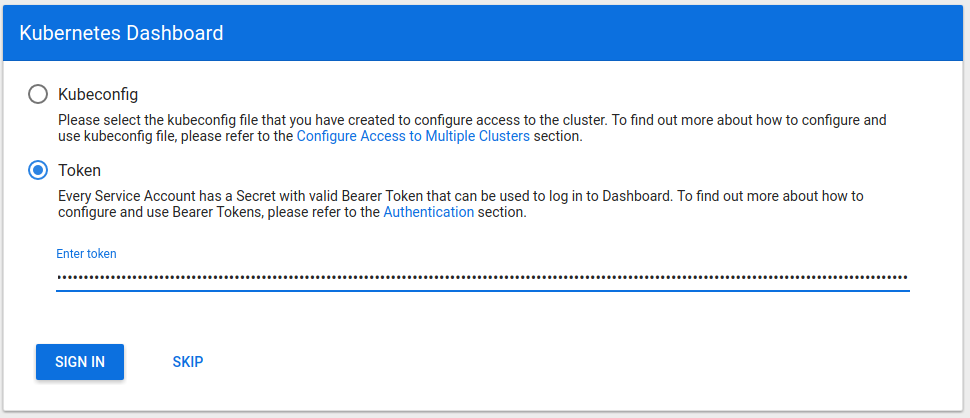
Sign in to the Dashboard
Sign in using the token previously retrieved.
Install Sample Pod
> vi nginx-example.yaml
| Code Block |
|---|
apiVersion: apps/v1 # for versions before 1.9.0 use apps/v1beta2
kind: Deployment
metadata:
  name: nginx-deployment
spec:
  selector:
    matchLabels:
      app: nginx
  replicas: 2 # tells deployment to run 2 pods matching the template
  template:
    metadata:
      labels:
        app: nginx
    spec:
      containers:
      - name: nginx
        image: nginx:1.7.9
        ports:
- containerPort: 80 |
...
> curl http://<NODE_IP>:31490
Troubleshooting
Reset and start all over
> sudo kubeadm reset
References
| Reference | URL |
|---|---|
| Building a Kuburnetes Cluster | https://medium.com/@KevinHoffman/building-a-kubernetes-cluster-in-virtualbox-with-ubuntu-22cd338846dd |
| Cluster Networking | https://kubernetes.io/docs/concepts/cluster-administration/networking/ |
| Creating a single master cluster with kubeadm | https://kubernetes.io/docs/setup/independent/create-cluster-kubeadm/ |
| Kubernetes Network Plugins | https://kubedex.com/kubernetes-network-plugins/ |
| Flannel | https://github.com/coreos/flannel#flannel |
| Dashboard | https://kubernetes.io/docs/tasks/access-application-cluster/web-ui-dashboard/#using-dashboard |
...