...
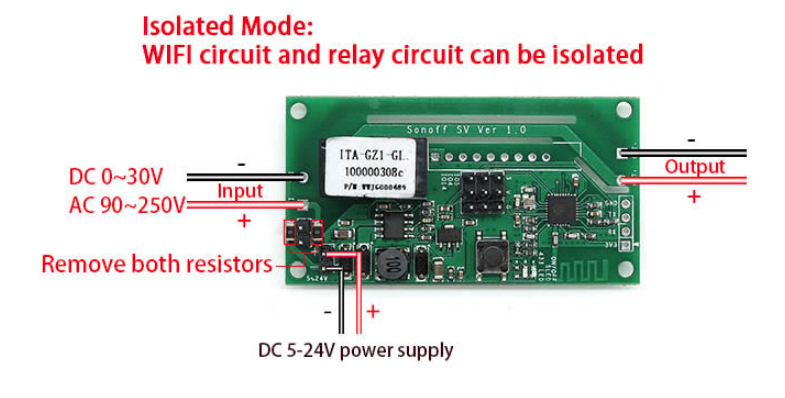
For this solution, we are using a Sonoff SV controller. This is a nice controller since it has everything we need to control the heater's remote relays. Additionally, we can power it from the heater itself since it accepts 5-24 volts input and the heater will supply us with 10v. We are going to use the Sonoff SV in isolation mode by removing the two resisters that would normally supply the power to the controller using the input voltage.
Firmware
Flashing
| Firmware | Download |
|---|---|
| v3.3 |
Once the flashing is complete, it will reboot. You will need to look for pool-heater, in your list of available WIFI networks.
...
From this UI, you can set the WIFI SSID and password for your network. Once it reboots again, you can log into it via http://pool-heater.local/. If that doesn't work, you'll have to find it in your network. Check your router to see if you can find it.
This custom firmware has a MQTT configuration allowing it to integrate with homebridge.
Homebridge Configuration
Using the mqtt-thing homebridge plugin, add the following configuration:
| Code Block |
|---|
{ "accessory": "mqttthing", "type": "thermostat", "name": "pool-heater", "url": "http://192.168.1.50:1883", "username": "homebridge", "password": "pass", "topics": { "getCurrentTemperature": { "topic": "pool-heater/status", "apply": "return JSON.parse(message).temperature_f;" }, "getTargetTemperature":{ "topic": "pool-heater/status", "apply": "return JSON.parse(message).tarTemperature_f;" }, "getTemperatureDisplayUnits":{ "topic": "pool-heater/status", "apply": "return 0;" }, "getCurrentHeatingCoolingState":{ "topic": "pool-heater/status", "apply": "return JSON.parse(message).state;" }, "getTargetHeatingCoolingState":{ "topic": "pool-heater/status", "apply": "return JSON.parse(message).mode;" }, "setTargetTemperature": { "topic": "pool-heater/command", "apply": "return 'setTemp ' + message;" }, "setTargetHeatingCoolingState": { "topic": "pool-heater/command", "apply": "return 'mode ' + message;" }, "setTemperatureDisplayUnits": { "topic": "pool-heater/command", "apply": "return 'tempUnits ' + message;" } }, "heatingCoolingStateValues": ["0","1"], "temperatureDisplayUnitsValues": [0,1], "minTemperature": 60, "maxTemperature": 100 }, |
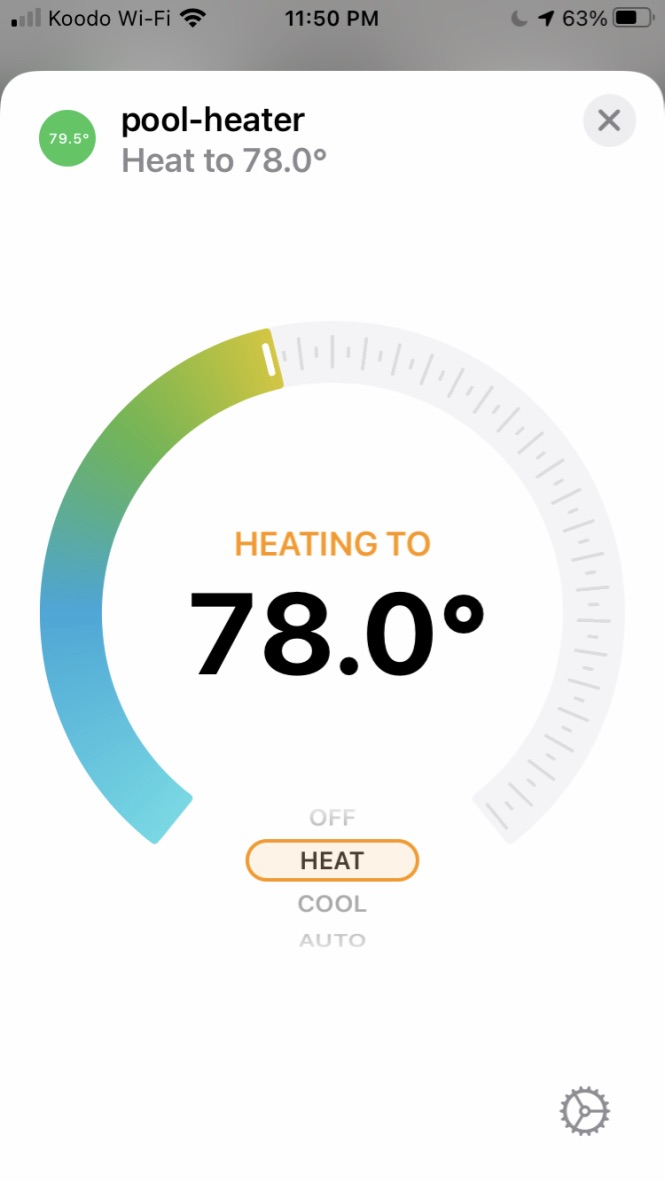
In the Apple Home App we now have access to our pool heater.
Wiring
Wiring Diagram
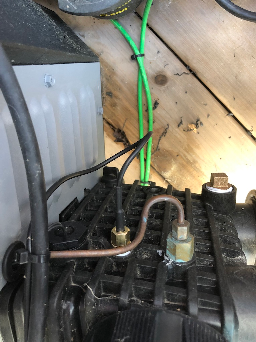
Wiring Pictures
...
- Use the dimple to center the drill bit. Drill a 1/4 in (6.4 mm) diameter hole through the port. Take care not to damage the plastic threads. TIP: Drilling a 1/8 in (3 mm) diameter hole first will help prevent thread damage
- Wrapped 5-6 turns of PTFE (Teflon) tape around the male threads of the adaptor.
- Thread in your 1/4 inch adaptor into the port. Make sure to get a snug fit. Do not over-tighten.

Firmware
We used custom firmware for our solution.
... more to come...
...
Homebridge Configuration
Using the mqtt-thing homebridge plugin, add the following configuration:
...