| Table of Contents |
|---|
Overview
We will detail the steps required to flash the open source Tasmota firmware on a Treatlife 3 way switch and configure it to work with Homebridge.
Hardware
| GPIO | Details |
|---|---|
| 4 | White LED |
| 5 | Red LED |
| 12 | Relay |
| 13 | Button |
| 14 | Sensor |
Install Tuya Convert on a Raspberry Pi
See https://github.com/ct-Open-Source/tuya-convert
Flash Device
Detailed instructions can be found: https://github.com/ct-Open-Source/tuya-convert
...
You will need to hold down the button to get this switch to flash.
> ./start_flash.sh
Configuring Switch
Configuring WIFI
Connect to the flashed device by looking for it's SSID - tasmota-####
...
The dimmer will reboot and connect to your wifi network. Check your router to find out it's IP address and connect to it via your browser.
Set the GPIOs
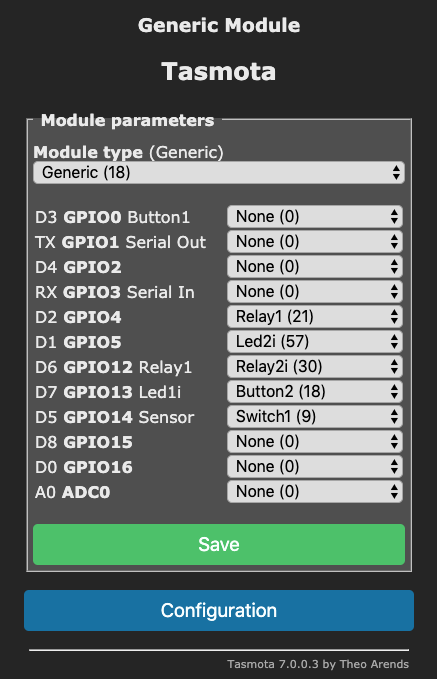
3 Way Setup
Issue the following from the console:
...
Should result in the following:
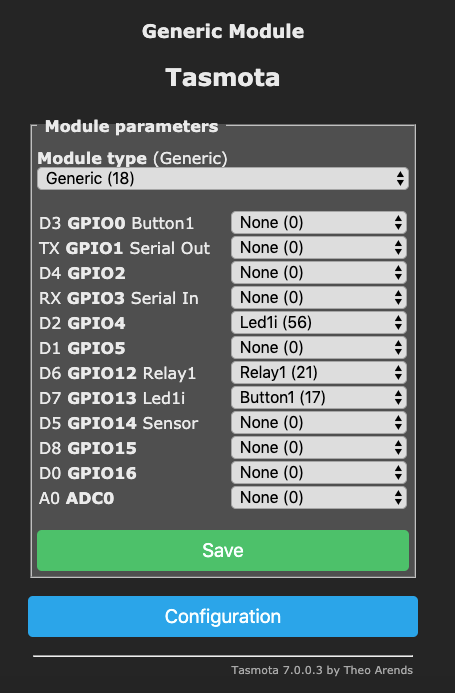
2 Way Setup
> backlog module 18;gpio4 52;gpio5 0;gpio12 29;gpio13 17;gpio14 0;switchmode 1
Homebridge Config
For integration with Homebridge, we are going to use the mqttthing plugin and run all of the commands through an mqtt server.
...
| Code Block |
|---|
        {
            "accessory": "SonoffTasmotaHTTP",
            "name": "switch1",
            "hostname": "192.168.1.172",
            "user": "admin",
            "password": "lifeisgreatxxx"
}, |
Reference
| Reference | URL |
|---|---|
| Tuya Convert | https://github.com/ct-Open-Source/tuya-convert |
| *Lasted Docs on Tuya MCU for Tasmota | https://tasmota.github.io/docs/#/TuyaMCU?id=tuyamcu-command |
| *How to setup a Tuya MCU Dimmer (Video) | https://www.youtube.com/embed/_3WW4NVYHrU |
| * List of supported Tuya Convert devices | https://github.com/ct-Open-Source/tuya-convert/wiki/Compatible-devices-(HTTP-firmware) |
| * Video showing how to configure Treatlife 3way | https://www.youtube.com/watch?v=9LIaDN7Nx2E |
...