...
| Code Block |
|---|
# download $ curl -LO "https://dl.k8s.io/release/$(curl -L -s https://dl.k8s.io/release/stable.txt)/bin/linux/amd64/kubectl" #install $ sudo install -o root -g root -m 0755 kubectl /usr/local/bin/kubectl |
Adding VPN Support
...
(AnyConnect)
These instructions assume that you are using Ubuntu.
Create a WSL configuration file
In your Ubuntu terminal, issue the following command:Record your current nameserver
| Code Block |
|---|
$ catsudo vi /etc/resolfwsl.conf |
Add the following:
| Code Block |
|---|
[network] # This file was automatically generated by WSL. To stop automatic generation of this file, add the following entry to /etc/wsl.conf: # [network] # generateResolvConf = false nameserver 172.17.192.161 |
1. cd /etc
2. echo "[network]" | sudo tee wsl.conf
3. echo "generateResolvConf = false" | sudo tee -a wsl.conf
4. wsl --terminate Ubuntu #(Terminate WSL in Windows cmd, in case is Ubuntu not Debian).
5. cd ~/../../etc (go to etc folder in WSL).
6. sudo rm -Rf resolv.conf (Delete the resolv.conf file).
6.5 Connect to your vpn
7. In windows cmd, with the vpn connected do:
> ipconfig /all to get the dns primary and secondary.
135.5.25.53
135.239.25.53
...
generateResolvConf = false |
Terminate your Linux instance
From a Windows Command Prompt issue the following command:
| Code Block |
|---|
> wsl --terminate Ubuntu |
Delete your existing resolfv.conf file
In your Ubuntu terminal, issue the following command:
| Code Block |
|---|
cd /etc
sudo rm -Rf resolv.conf |
Connect to your VPN
Connect to the VPN using your AnyConnect client.
Determine your VPN Connection DNS IP Addresses
From a Windows Command Prompt issue the following command:
| Code Block |
|---|
> ipconfig /all

   Connection-specific DNS Suffix  . : vpn.company.com
   Description . . . . . . . . . . . : Cisco AnyConnect Secure Mobility Client Virtual Miniport Adapter for Windows x64
   Physical Address. . . . . . . . . : 00-05-9A-3C-7A-00
   DHCP Enabled. . . . . . . . . . . : No
   Autoconfiguration Enabled . . . . : Yes
   Link-local IPv6 Address . . . . . : fe80::3d7f:b69b:dd71:28d1%25(Preferred)
   Link-local IPv6 Address . . . . . : fe80::cde5:6a02:e9d2:f284%25(Preferred)
   IPv4 Address. . . . . . . . . . . : 135.255.134.209(Preferred)
   Subnet Mask . . . . . . . . . . . : 255.255.240.0
   Default Gateway . . . . . . . . . : ::
                                       135.255.128.1
   DHCPv6 IAID . . . . . . . . . . . : 419431834
   DHCPv6 Client DUID. . . . . . . . : 00-01-00-01-28-25-22-A7-6C-02-E0-CD-FE-58
   DNS Servers . . . . . . . . . . . : 135.5.25.53
                                       135.239.25.53
   Primary WINS Server . . . . . . . : 135.5.8.20
   Secondary WINS Server . . . . . . : 135.5.136.20
NetBIOS over Tcpip. . . . . . . . : Enabled |
From the above output, we can see that the VPNs DNS IP addresses are: 135.5.25.53 and 135.239.25.53.
Update your Resolv.conf File
In your Ubuntu terminal, issue the following command:
| Code Block |
|---|
$ sudo vi /etc/resolve.cong |
Replace contents with the following
| Code Block |
|---|
nameserver <VPN_DNS_IP1>
nameserver <VPN_DNS_IP2>
nameserver 8.8.8.8 |
Terminate your Linux instance
From a Windows Command Prompt issue the following command:
| Code Block |
|---|
> wsl --terminate Ubuntu |
Lock the Resolv.conf file from Updates
In your Ubuntu terminal, issue the following command:
| Code Block |
|---|
$ sudo chattr +i /etc/resolv.conf |
Set the NET IP Interface for the VPN Connection
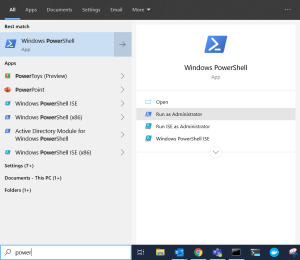
Open Windows Powershell with Administrative rights:
From this Windows Powershell instance, Issue the following command:
| Code Block |
|---|
Get-NetAdapter | Where-Object {$_.InterfaceDescription -Match "Cisco AnyConnect"} | Set-NetIPInterface -InterfaceMetric |
9. echo "nameserver X.X.X.X" | sudo tee /etc/resolv.conf (Create resolv.conf and append the line.)
10. echo "nameserver X.X.X.X" | sudo tee -a /etc/resolv.conf (Append the line in resolv.conf)
11. wsl --terminate Ubuntu (Terminate WSL in Windows cmd, in case is Ubuntu not Debian).
12. sudo chattr +i /etc/resolv.conf
13. And finally in windows powershell with Administrative rights:
...
6000 |
References
| Reference | URL |
|---|---|
| Fix DNS resolution in WSL2 | https://gist.github.com/coltenkrauter/608cfe02319ce60facd76373249b8ca6 |
...
